|
|
Export online
When exporting your video project, you can prepare it for uploading to YouTube and other video hosting sites.
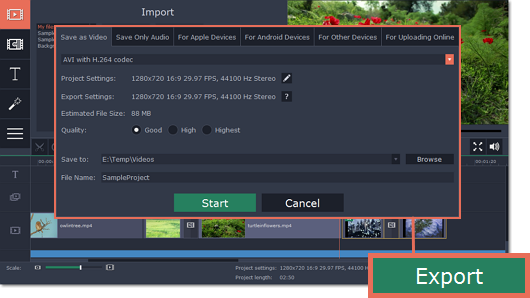
Step 1: When your project is complete, click the Export button in the bottom right hand corner of the Editor to open the exporting window.

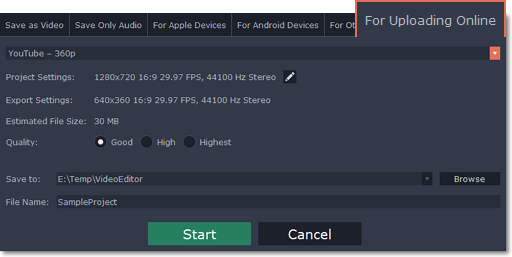
Step 2: The upper part of the Export window contains a row of tabs. Click For Uploading Online to open the list of relevant settings.

Step 3: Open the list at the top of the tab and choose a suitable format for saving your video.
For YouTube and other video sharing websites:
If you want to upload the video to a video hosting website, such as YouTube, you can simply choose one of the available presets, such as YouTube - 720p. For some, you can choose to save the video in a variety of resolutions: for example, you can choose HD or standard-definition video when saving for Vimeo. However, if the original videos are of HD quality, we recommend that you choose a higher resolution, as the video sharing service will automatically create a lower-resolution copy of your video for low-bandwidth viewers.
Please note that some video sharing websites, such as Vimeo, limit HD video uploads for different types of accounts. We advise you to check the website's upload restrictions, as well as any copyright policies, and to make sure that you have the right to publish the videos in question under copyright laws and your country's law.
For your own website or web storage:
At the bottom of the list, you can find a number of web-ready formats. Choose the one that best fits your upload requirements. You can also embed YouTube videos into your blog or website: simply save your video using one of the YouTube options, upload the video to your YouTube account, go to your video's page and then click Share, and go to the Embed tab. YouTube will give you an HTML5 embed link for your video that you can use in your website or blog.
Note the Export Settings section, where you can see the properties that your output video will be saved with. These properties are defined by the selected format, resolution, or the requirements of the chosen video sharing website.
Step 4: Select video quality (optional).
If your project is heavy on small details and filters, you can select High or Highest quality to export the finished video with a higher bitrate. This will increase the output file size but will preserve better quality. For most other projects, Good quality will provide a nice result at a small file size.
Step 5: Name your file and choose a destination folder.
In the 'Save to' field, enter the folder where you would like to store the file. By default, this will be the directory for saving output videos specified in the preferences. To set a different folder, click the Browse button and choose the folder in the Windows Explorer window, or enter the path manually into the box. Name your video in the File Name field: the project's name will be filled in for you by default.
Step 6: Click the Start button to begin processing the video file. This may take up to a few minutes.


