|
|
Cutting recordings
This guide will show you how to cut out parts from video recordings using the built-in capture editor.
Step 1: Cut fragments
1. Move the position marker around the area you want to cut.
2. Click the scissors button. A fragment with two cut markers will appear at the current position.

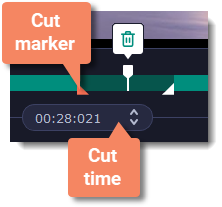
Precise positioning
For more precise positioning, click on the cut marker on the seek bar and do any of the following:
-
Click the arrows next to the time to move the marker by a small interval.
-
With the cut marker selected, use the arrow keys to move it left or right by 100 milliseconds.
-
Manually enter the necessary time.
Step 2: Delete fragments
1. On the seek bar, click a fragment to select it. The selected fragment appears as a darker shade.
2. To delete the selected fragment, click the trash can button above it.
A dotted line will appear on the seek bar where a fragment has been deleted: 

How to undo cutting
To cancel a cutting action, click Undo  or press ⌘Z. To repeat a cancelled action, click Redo
  (⌘Y).
(⌘Y).
To exit the cut mode, click the scissors again.
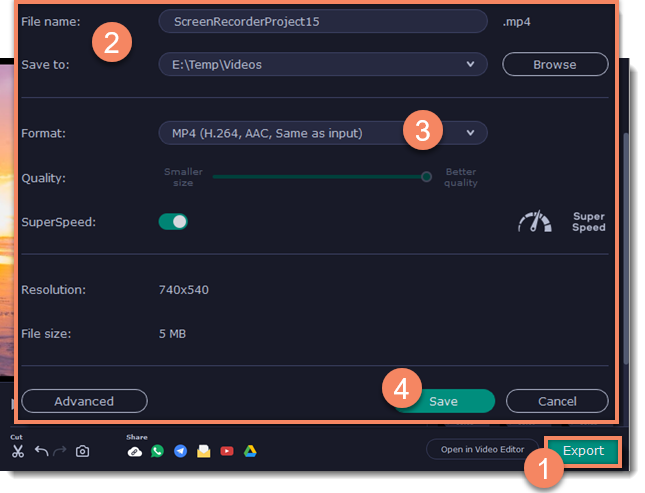
Step 3: Save the edited video
If you've cut the video, you need to save it to apply the changes.
1. Click Export. The window with saving options will appear.
2. At the top of the window, choose where to save the file and enter a file name.
3. Choose a format for the video. If you don't know which format to choose, leave MP4 selected. It will save faster and at no quality loss.
4. Click Save to start processing the video. This may take a while for longer videos.