
|
|
Exporting Images
After you've selected the necessary adjustments for your photos, it's time to export them.
Step 1: Open the Export window
Click the Batch Export button in the bottom right-hand corner of the main window to open export options.
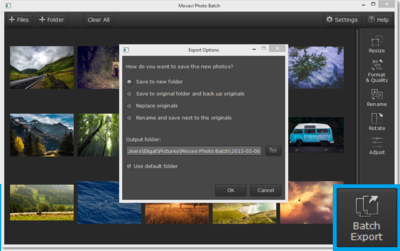
Step 2: Choose where to save the files
Choose one of the available options of saving the processed photos:
Save to new folder – the processed photos will be stored in the folder specified in the field below.
Save to original folder and back up originals – the original photos will be moved to the folder specified in the field below, while the processed photos will be stored in the original folder.
Replace originals – the processed photos will be saved to the original folder, while the original photos will be deleted. We recommend that you only use this option if you are sure you will not need the original photos.
Rename and save next to the originals – Both the original photos and the processed photos will be stored in the same folder. The processed photos will have a number, e.g. '(1)' added to the file name.
Step 3: Start exporting
Finally, Click OK to start the exporting process. This may take up to a couple minutes if you are working with many large photos.
