
|
|
Adjust colors
The Adjust options allow you to manually adjust the photo's brightness, contrast, color, and other parameters. Click the Adjust button on the right to open the image adjustments.

Magic Enhance
For an instant fix, click the Magic Enhance button. Movavi Photo Editor will automatically adjust the brightness and contrast of your image.
Histogram
The histogram, located at the bottom of the Adjust tab, represents the distribution of colors and their shades in an image. When you view a histogram, it can give you information about how prominent a certain color is in the image, as well as about its brightness and contrast. The left edge of the histogram contains the dark areas, while the light areas are on the right. For example, if most of the colors are concentrated in the left-hand side, then the image is probably too dark, and vice versa. The height of a color's graph represents its amount in the image. This way, you can use the histogram to aid you in adjusting the image's colors.
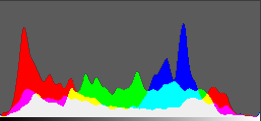
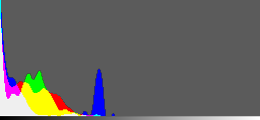
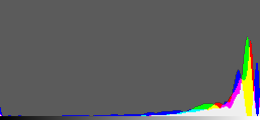
Histograms of normal, underexposed, and overexposed images.
Above the histogram, you will find several groups of sliders. Each slider allows you to change a certain parameter of the image, such as its brightness.
Brightness
Allows you to change the overall amount of light in the whole image, without changing any other parameters. When you increase or decrease brightness, note how the histogram moves left or right, but maintains its original shape.
Contrast
Allows you to change the difference between the lightest and darkest parts of the image. This can help you make the image more vivid, but too much contrast can cause unwanted posterization.
Saturation
Allows you to make the colors richer (positive values) or more subdued (negative values). Settings Saturation to -100 will make the image grayscale.
Hue
Allows you to change an image's overall color. Unlike tinting or color temperature (see below), changing an image's hue will not color the picture in shades of one color, rather, it will shift all the image's colors in a given direction.
Temperature
Allows you to make the image feel warmer or colder, by adding orange or blue color respectively.
Tint
Allows you to add a red or green tone to the image, either for color correction, or for an artistic feeling.
Exposure
In photography, exposure is the amount of light that is allowed to reach the camera's sensor, which is usually achieved using a combination of shutter speed, aperture, and lighting. If there is too much light on average, you may lose some details in the dark parts, while the light areas may become 'washed-out', and vice versa. This allows you to imitate a higher or lower exposure, as if you set it on your camera when taking the shot.
Gamma
Allows you to change how the middle tones appear on your image, without affecting the whites or blacks.
Highlights and Shadows
These two sliders allow you to make each component more prominent in the image, and thus make the image darker or brighter.
Blur
Allows you to slightly blur the image to reduce noise or smoothen out defects.
Sharpness
Allows you to sharpen the image to bring out more details. Please be aware that oversharpening an image can add noise.
If you want to discard the most recent change, click the Undo button at the bottom of the screen.
If you want to cancel all the color adjustments, click the Reset button underneath the sliders.
