
|
|
Cut out the background
Movavi Photo Editor can help you quickly and easily cut out people and objects from any background. You can use it to create product photos, funny collages and more.

Step 1: Cutting out the Background
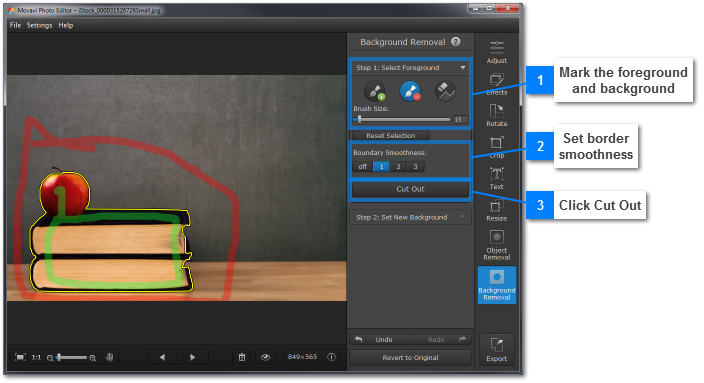
1. Mark the foreground and background areas:
Use the tools to specify which parts of the image belong to the object you want to keep, and which belong to the background and must be clipped away.
|
|
The green Foreground Brush lets you select the object you want to keep. Paint a few strokes inside the object(s) to mark them as the foreground. There is no need to color the entire object, as Movavi Photo Editor uses a smart edge detection algorythm.
|
|
|
The red Background Brush lets you mark the background, which needs to be erased. Swipe a few strokes of the red brush on the background around your object. Pay closer attention to parts of the background that have similar color or pattern to that of the foreground.
|
|
|
The Eraser lets you erase both red and green selection in case you make a mistake.
|
Now that you've marked the foreground and the background areas, a yellow border line will appear around your object. Sometimes, with complex shapes or background patterns, you may need to add a few more strokes of each brush to specify the border line. For higher precision, try zooming in on the image and using a smaller brush size.
2. Set Boundary Smoothness:
Sometimes, due to the complexity of the background or the object's shape itself, the yellow boundary may seem a little 'jagged' where it shouldn't be. To reduce this effect, you can set the Boundary Smoothness so that the borderline looks more natural. Likewise, if there are many small details on the edges of the object, select a low smoothness to preserve their shape.
3. Cut out the background
When the yellow border completely encompasses the object you want, click Cut Out to clip away the background. The background will be removed, and you can proceed to the next step, where you can choose a new background. If you want to return to editing the selection, click Step 1: Select Foreground tab to show your selection and the selection tools. Once you've adjusted the selection, simply click the Cut Out button once again to proceed.
Step 2: Set the New Background
When you click Cut Out, you will be switched to Step 2, where you can select a new background for you image and move the cut out objects as you like.
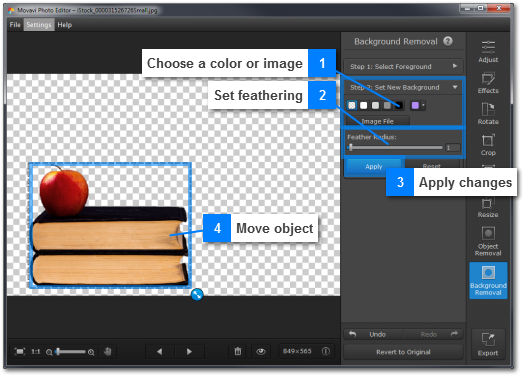
1. Choosing a background color or image
In this step, you can choose what you'd like to use as the new background for the object you've cut out.
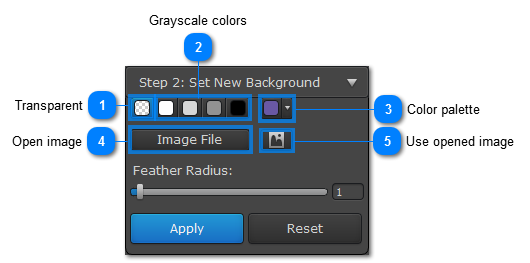
Transparent:
If you want to keep a transparent background, choose the 'transparency' icon to the left of the color palettes  .
.
Grayscale colors:
To use a standard white, grey, or black background, choose one of the color icons.
Custom color:
To choose a different color, click the arrow on the rightmost color sample to open the palette. Click More in the palette to open the standard color selection dialog box where you can mix a custom color.
Image:
To open an image to use as the background, click the Image File button and select the file you want to use. It will then be added as the new background.
2. Feather Radius
If the object has uneven edges or color noise along the edges, you can use feathering to slightly blur the edges and make a smoother transition from the object to its new background. Drag the Feather Radius slider to set the necessary blurring level.
3. Move the object:
Click and drag your object to move it anywhere you want in the image. If the object is much smaller than the original image size, you can later crop the image.
Step 3: Apply the changes
Finally, click Apply to accept the changes. Please note that if you switch to another tab while removing a background, your selection will be lost.
Don't forget to save your edited image!
