|
|
Erase objects
The Object Removal tool can help you erase unwanted objects or people from your images. Movavi Photo Editor uses a special algorythm to reconstruct the background as if the deleted objects were never there. All you need to to is mark the objects you want to remove.
Step 1: Switch to the Object Removal tab.

Step 2: Choose a selection tool
There are several selection tools available for your convenience:
|
|
Use the Brush to freely paint the red selection area. The Size slider below will set the brush size
|
|
Use the Eraser to deselect parts of the image. Just like with the brush, you can change eraser size with the slider below.
|
|
|
Use the Magic Wand tool to select adjacent areas of uniform color in a single click.
|
|
Use the Clone Stamp Tool to select a part of the image to transfer onto another part of the image. You can use the Clone Stamp Tool to mask small blemishes or duplicate objects.
|
|
|
Use the Lasso tool to outline an object. Click the arrow on the lasso icon to change the type of lasso:
| ||
|
|
The default Freehand Lasso allows you to freely draw the object's outline.
|
|
The Polygonal Lasso allows you to outline the object with straight lines.
|
Step 3: Mark unwanted objects
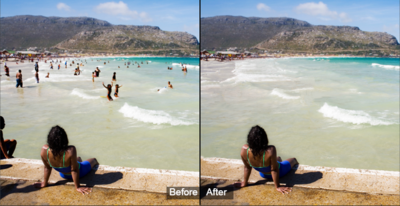
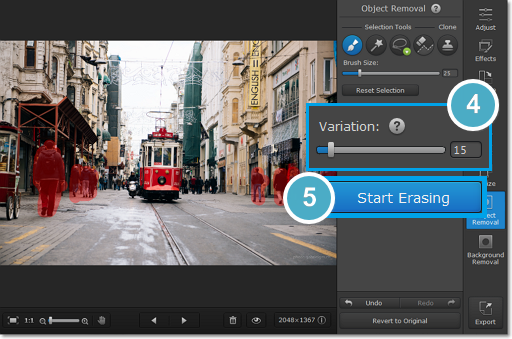
Using the selected tool, mark the objects you want to delete in the image. You can mark and delete all the objects at once or one after one. When selecting people and objects, don't forget about their shadows and reflections.

The people marked with red will be removed from the image.
If you need to make the selection larger or smaller on all sides, use the following keyboard shortcuts:
Ctrl+Shift+P to expand the selection
Ctrl+Shift+M to contract the selection
Step 4: Set Variation
When you remove an object, the program will recreate the background by using pixels from the rest of the image. Variation affects how far away from the object the replacement pixels can be taken from. For lower variation values, the replacement pixels will be taken from the area only directly adjacent to the object, while at 100 they can be taken from any part of the image.
Different variation values will provide different results depending on the size of the object, its background, and the overall uniformity of the image. Try out a few values to see which works best for your pictures.

For example, in this image it would be best to select a lower variation so that the sea is not cloned onto the sand.
Step 5: Erase!
Click the Start Erasing button to begin processing. Please note that erasing objects with high variation values will take slightly longer. If you aren't satisfied with the result, you can click the Undo button and adjust your selection or choose a different variation value. Repeat steps 3-5 to remove any other objects you want.
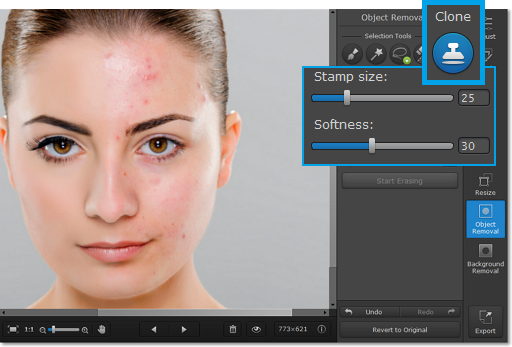
Step 6: Clone retouching
If there are some more small defects left over after erasing, you can manually correct them with the Clone Stamp tool. You can select a patch of the image and copy it over the defects.
1. Select the Clone Stamp tool. Choose the stamp size and softness (how smooth the edges of the stamp should be).
2. Hold down the Alt key and click onto the part of the image that you want to clone. Usually, it should be close enough to the blemish so that the copied spot is similar to the original in color and texture.
3. Paint over the blemish with the copied sample. The source will also move as you paint with the stamp, in order to give a more natural look to the edited parts.