
|
|
Recording video from players
Before you start:
Note the quality and resolution of your video. For best video quality, it is recommended that you record the video as close to its real resolution as possible.
-
If the video is larger than your screen, maximize the player window and record the full screen.
-
If the video is smaller than your screen, set the player settings to display the actual size. In this case, stretching the video to the full screen will decrease the quality.
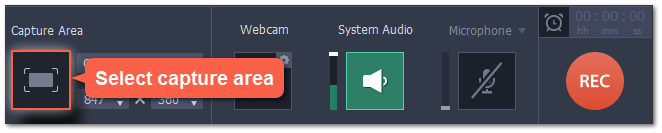
Step 1: Select capture area
1. On the recording panel, click the Select capture area button.
2. With the crosshair, select the part of the screen that you want to record.
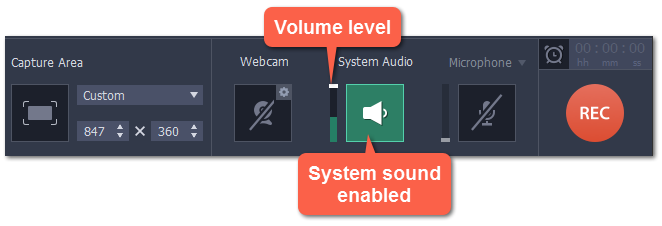
Step 2: Set up the sound
1. To enable recording sounds from the player, click the speaker button under System Audio. The button will appear green when enabled.
2. Use the slider to the left of the speaker button to set the volume of the player's recording.
3. To make sure that other sounds don't interfere with your recording, check that the Microphone button is disabled (black), and close other windows or browser tabs that might play sounds during your recording.
Step 3: Record video
When you're ready, click the REC button on the recording panel and start playback in the player. The recording panel will hide
Tip: You can trim the beginning later, so don't worry if you start playback after recording has begun.
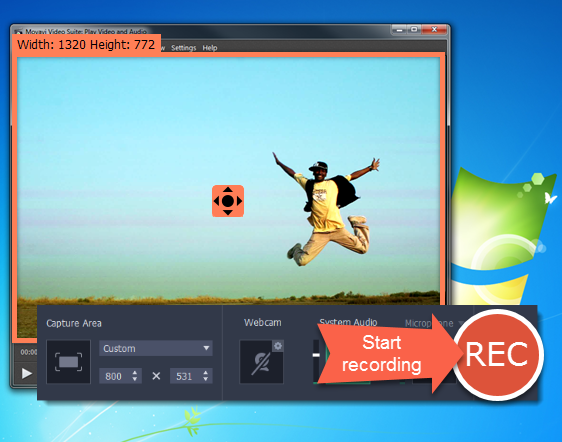
To end the recording, press F10 or click Stop on the recording panel.
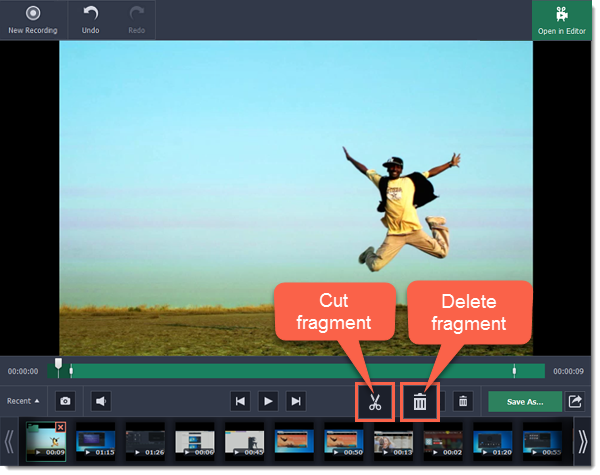
Step 4: Edit and convert (optional)
Your recording is ready and saved in MKV format, and you can view the result in the capture editor. Now, you can trim the video or convert it to a different format.
1. To trim the video from the beginning or from the end, move the position marker to where you want to trim the video and click the scissors button to cut off the fragment. Then, select the unwanted fragment and click the trash can button to delete the fragment.
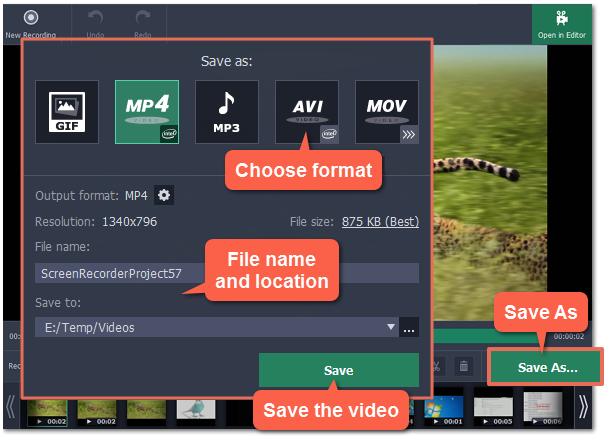
2. Click the Save As button to open output options.
3. At the top of the window, select the format you want to save the recording in.
4. Under File name, enter a name for the new video. Then, click the button under Save to and choose where you want to save the video.
5. Click Save to start processing the new file.
Troubleshooting
Some video player programs have video output settings that prevent capturing video and taking screenshots. If you are having trouble recording video from any of the following players, follow the steps to change the player's settings and enable video capturing.
Capturing video from VLC (VideoLan Media Player)
(for Windows XP users)
1. In VLC player, open the Tools menu and choose Preferences.
2. Switch to the Video tab (in Simple mode)
3. In the Display section, find the Output list. If DirectX (DirectDraw) video output is selected, try using a different output mode.
Capturing video from Media Player Classic
(for Windows XP users)
1. In Media Player Classic, open the View menu and select Options.
2. Go to the Playback > Output section in the tree on the left.
3. Find the DirectShow Video option. Here, you can choose from a list of video renderers that will affect how the player displays video on your screen. If the Overlay Mixer Renderer is selected, select any other renderer from this list.
4. Click OK to accept the changes.
Capturing video from Windows Media Player
(for Windows XP users)
1. In the main player menu, open the Tools menu and select Options.
2. In the Options window, switch to the Performance tab.
3. Click the Advanced button.
4. In the Video Acceleration section, find the Use overlays option and deselect it.
5. Click OK to accept the changes.
