
|
|
Project settings
Project settings affect your entire project and define how different kinds of videos, photos, and audio files are composed into your finished video. You can set up your project's video and audio settings when creating the project or at any other time.
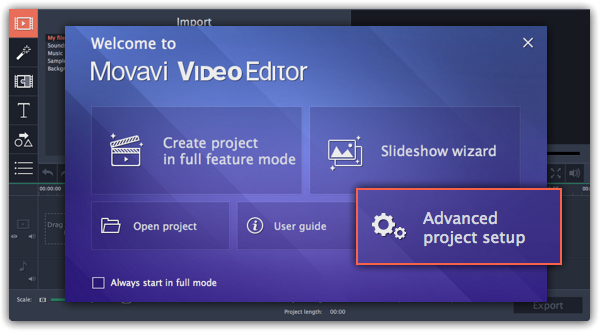
Opening project settings
When creating a project:
When you create a new project or launch Movavi Video Editor, you will see a welcome screen. To change the settings before starting the project, click Advanced project setup.
During editing:
-
On the bottom panel of Movavi Video Editor, find the pencil icon next to the information about your project.

-
Open the Edit menu and choose Project Settings.The Project Settings window will open.
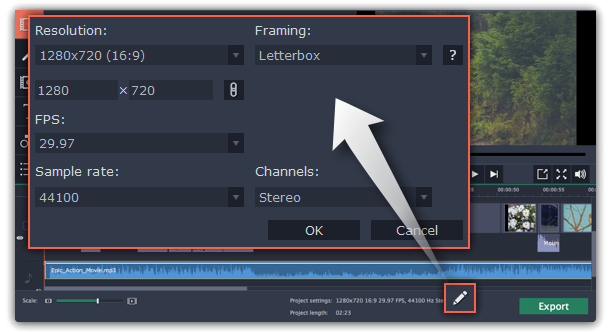
Video settings
The video settings apply to all videos and photos used in the project. When you import the media files, they will be scaled to fit inside the selected frame size according to your settings.
Resolution
The frame size or resolution determines the videos width and height in pixels. Open the Resolution list to select from the most common resolutions. For your convenience, each resolution is marked with its respective aspect ratio. Ideally, the frame size should match the resolution of the videos and photos you plan to use in your project, and should not exceed the resolution of the largest video. Smaller resolutions allow you to make the output video smaller and thus save your disc space, however, this will sacrifice some video quality due to downscaling.
|
Frame Size
|
Aspect Ratio
|
|
320x240
|
4:3
|
|
640x480
|
4:3
|
|
1280x720
|
16:9
|
|
1280x960
|
4:3
|
|
1920x1080
|
16:9
|
|
1920x1440
|
4:3
|
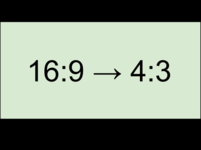
Aspect ratio
The aspect ratio is the ratio of the video or photo's width to its height. The most commonly used aspect ratios are 4:3, used generally for analog TV and in many old movies, and 16:9, the standard resolution for widescreen digital video.
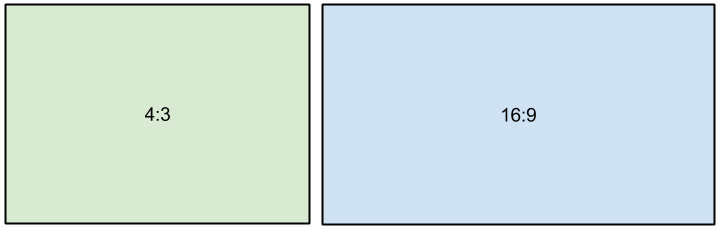
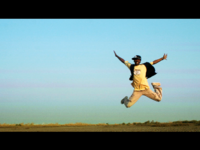
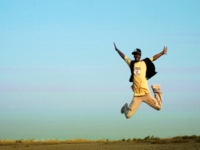
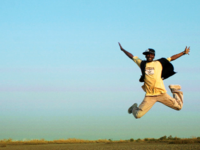
A relative comparison of aspect ratios
When you add videos and photos to the project, they will be scaled to fit the specified frame size. If you add media files with an aspect ratio different from that of the project, you may see black bars appear on the sides of the video. Furthermore, if you add low-quality videos to a project set up to a high resolution (frame size), the small video may be stretched to fit the frame and thus may appear pixellized. For best results, we recommend setting the frame size and aspect ratio to match all or most of the videos and photos you are planning to use.
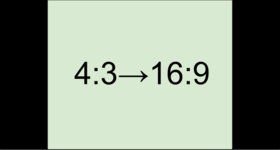
Examples of black bars appearing when importing videos with a different aspect ratio.
If you cannot find the necessary frame size in the list, you can manually enter the width and height into the respective boxes of the Project Settings window. Note the button with the link icon to the right of the boxes. It allows you to maintain existing proportions when entering new values:  – the proportions are constrained, allowing you to set a larger or smaller frame size without changing the aspect ratio;
  – you can freely enter the width and height with any proportions. Simply click this button to toggle the two states.
Resize method
Choosing a resize method can help you manage how all of your videos and photos are resized to fit inside the frame size you've set. This is especially important when the aspect ratio of some videos and photos does not match the aspect ratio of the project and you need to get rid of the black bars. There are three resizing options available:
Letterbox – the video will be resized to fit inside the frame entirely. This method allows you to keep the whole video inside the frame without distortions, but may place black bars around the video.

Stretch – the video is fit entirely inside the frame and then stretched on one axis in such a way as to fill the entire frame without leaving black bars. This allows you to cover the entire frame, however, the objects in the video may appear horizontally or vertically distorted.

Crop – the video will be resized to be slightly larger than the frame, cropping the parts that do not fit inside it. This allows to cover the entire area of the frame without distorting any of the objects inside the video or without leaving black bars, however, this may not suit some clips where important objects are near the edge of the frame.

Audio settings
Sample rate
The sample rate affects the quality of digital sound, and defines the maximum frequencies that an audio stream can contain. The default sample rate is set to 44100 Hz, which exceeds the maximum frequencies of human hearing and is used to record Audio CDs and most music tracks.
Channels
Stereo sound contains two channels and has the capacity to convey the relative location of sound sources, which makes it best for recording music; mono sound has only one channel and produces sound without differentiating left and right channels. Stereo is the generally preferred number of channels, however, some mobile devices record sound only in mono mode.
See also:
