|
|
Unused languages
Your system and most installed applications, like Mail and iPhoto, come with a number of language packs that allow you to easily change the application's language whenever you feel like it. However, even if you speak all of the available languages (good job!), most likely you'll only be using one or two on a regular basis, while the rest of the language packs will simply be sitting on your hard drive and taking up valuable space.
Mac Cleaner can help you remove unnecessary language files, freeing up hundreds of megabytes of disk space!
Removing unused application languages
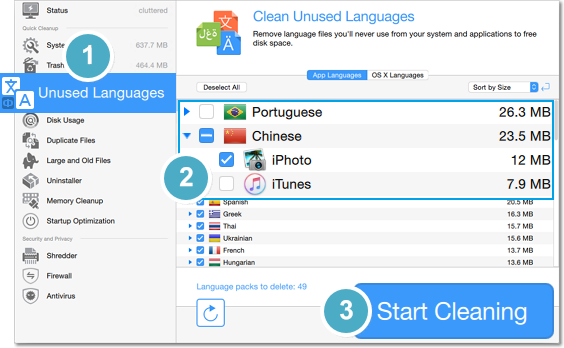
1. Click Unused Languages in the sidebar to open language cleanup. You will see a list of languages.
2. Review the list of languages.
-
If you don't want to delete a language, deselect it in the list.
-
Click the arrow next to a language to see which applications have it installed. Here, you can select which applications to remove the language from.
-
To keep from accidentally deleting your favorite languages, you can exclude them from this list in Preferences (see instructions below).
3. Click Start Cleaning to remove all of the selected the languages.

Note that any applications you install after cleaning unused languages may come with new language packs that take up your disk space. You may want to come back to clean more unused languages if you've installed new applications.
Removing unused system languages
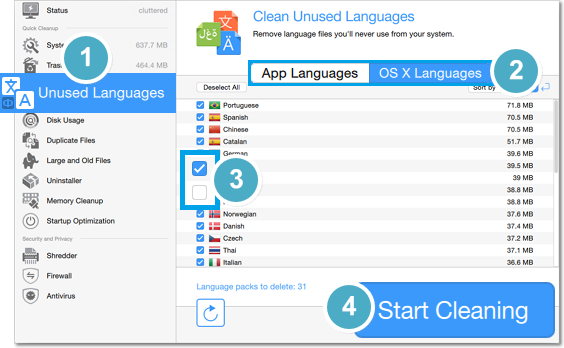
1. Click Unused Langages in the sidebar to open language cleanup. You will see a list of languages.
2. At the top of the Unused Langauges section, click the OS X Languages tab. It may take a few moments to scan your system.
3. Review the list of languages.
-
If you don't want to delete a language, deselect it in the list.
-
To keep from accidentally deleting your favorite languages, you can exclude them from this list in Preferences (see instructions below).
4. Click Start Cleaning to remove all of the selected languages.

Removing unused languages with Quick Cleanup:
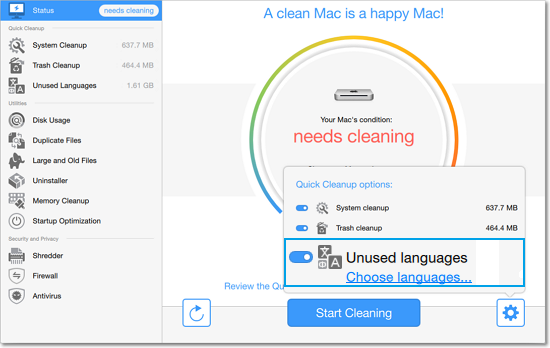
When you run Quick Cleanup, you can let Mac Cleaner remove all unused language files along with the temporary system files. In the Status section, click the cogwheel icon in the bottom right corner and make sure that the Unused languages option is enabled. Then, click Start Cleaning to let Mac Cleaner do its job!

Keeping the languages you use:
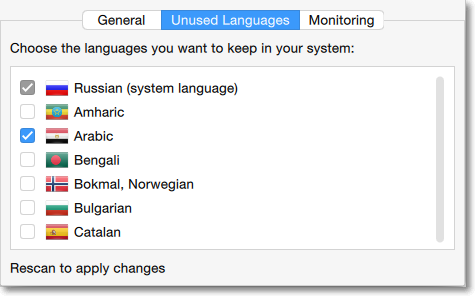
By default, English, as well as the current system language will be excluded from deletion, but you can add other languages that you want to keep on your Mac in Preferences.
1. Open the Movavi Mac Cleaner menu and choose Preferences.
2. At the top of the Preferences window, choose the Unused Languages tab.
3. There, you will find a list of languages. Select the languages you want to keep. They will never be deleted, and will not show up in the Unused Languages list when you run a scan.
4. Close the Preferences window and click the Rescan button at the bottom of the Unused Languages page to apply the changes.


