
|
|
Movavi Picverse
Erasing objects manually
-
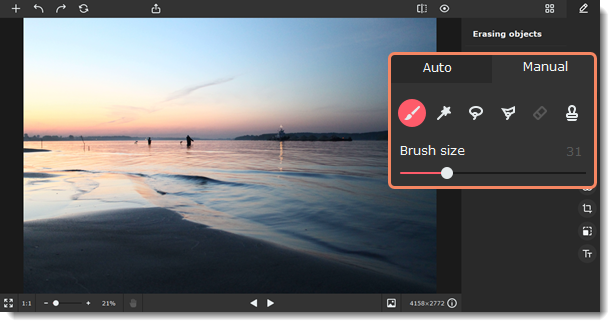
In the Erasing objects tool, select Manually.
-
Use any selection tool to mark the object you want to delete.
 With a brush you can mark the selection area freely. Use the brush size slider to adjust the brush.
 Click on an area with a magic wand, and all adjacent areas of uniform color will be selected.
 Create a starting point with a lasso and move your cursor around the object's outline. Then bring the cursor closer to the starting point but from the other side, and the selection will be created.
 With a polygonal lasso, you can outline an object with straight lines. Set a starting point, create a line, and click to fix it. Do this until you're back to the starting point, and bring the cursor close to it to create a selection.
 Use an eraser to deselect parts of the image. Just like with the brush, you can change eraser size with a slider. The eraser only affects your selection and does not erase objects in the photo.
 Use a stamp to select a part of the image to transfer onto another part of the image. You can also use the stamp to mask small blemishes or duplicate objects.
 -
Select objects you want to erase. Don't forget about their reflections and shadows. Adjust the Selection area slider to change the size of the area that will be selected. To remove an unwanted selection, use the eraser or click Reset to clear all selections from the image.
-
Click Erase. The processing might take up to several minutes if the selected area is too big. If you don't like the result, click the Undo button
 at the top panel, adjust the selection area and try again.
-
If you see some distortions in the picture, use a brush or a lasso to select distorted areas and click Erase again. Repeat until all the distortion is fixed.

