
|
|
Uploading online
After you finish your video, you can share it to YouTube, Vimeo or Google Drive right from the export window.
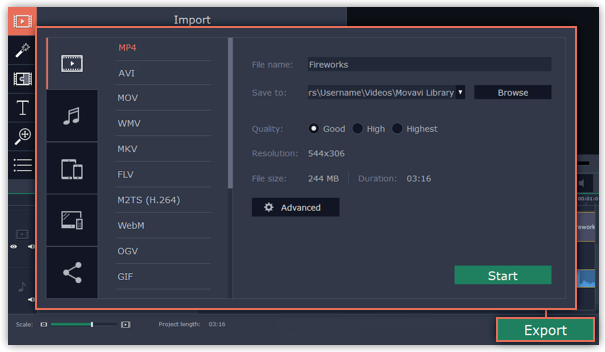
Step 1: Open the Export window
Click the Export button to open the exporting window.
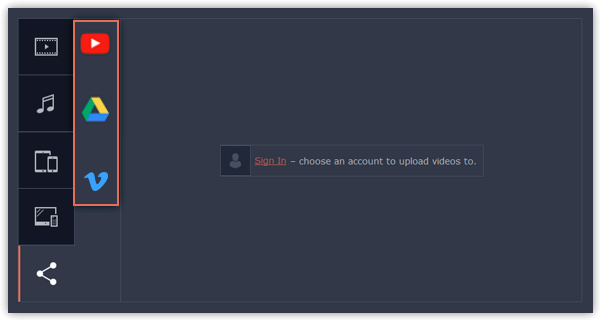
Step 2: Switch to the Upload online tab
In the left hand part of the Export window click on the Upload online tab.

Step 3: Choose a service to upload to
On the Upload online tab select the service you would like to upload your videos to: YouTube, Vimeo or Google Drive.
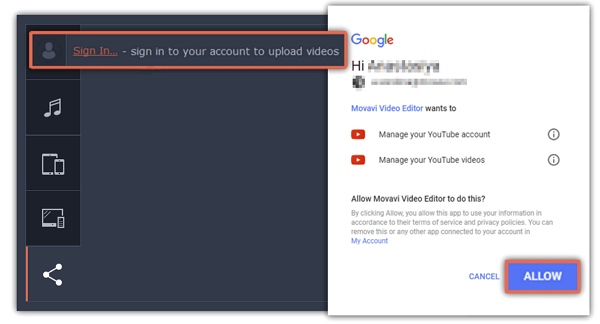
Step 4: Sign in to your account
-
Click Sign in. The authentication page will open in your browser.
-
Sign in to your account and click Allow to let Movavi Academic upload videos.
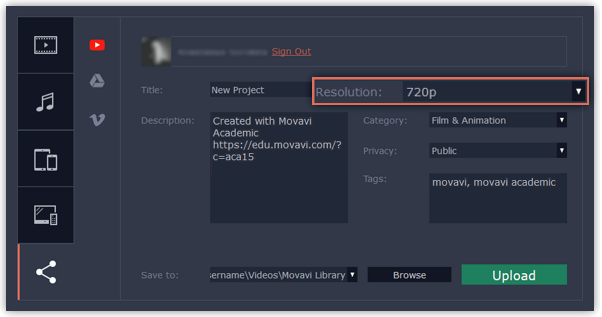
Step 5: Choose a resolution
In the Export window, open the Resolution list and choose a resolution that suits your project.
-
For best results, choose a resolution that is equal to or less than the height of your project. You can find the resolution of the project at the bottom of the main window, next to Project settings. For example, if your project is 1280x720, choose the 720p resolution.
-
This resolution will be the highest quality available for your video. Lower resolutions will be generated automatically by the website.
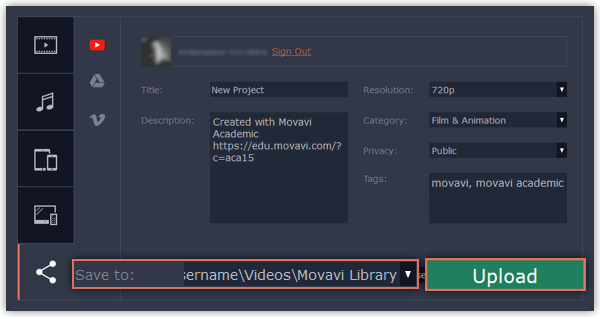
Step 6: Fill in the details (YouTube)
-
Fill in the title and description for your video.
-
Add some tags to help users find videos by relevant topics. Separate tags with commas and add a number sign (#) before each one.
-
Choose a category to help viewers find relevant content.
-
Open the Privacy box and choose who you want to see the video:
-
Private – videos can only be seen by you and the users you choose.
-
Public – videos can be seen by and shared with anyone.
-
Unlisted – videos can be seen and shared by anyone with the link.
*YouTube allows users to upload videos up to 15 minutes. To upload longer videos, you need to verify your account.

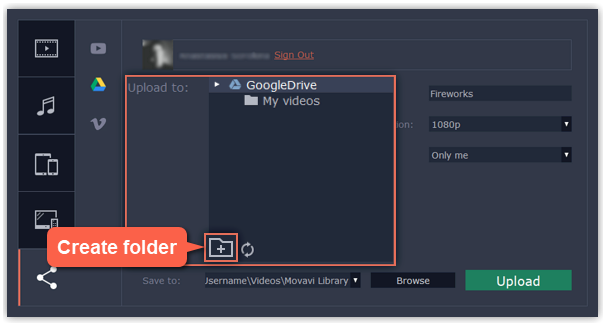
Step 6: Fill in the details (Google Drive)
-
Fill in the title for your video.
-
Select a Google Drive folder where you want your video to be uploaded. You can create new folders in your Google Drive storage straight in the export window or you can create one in your browser and then click Refresh to see the new folder in the export window.
-
Open the Privacy box and choose who you want to see the video:
-
Only me – videos can only be seen by you and the users you choose.
-
Get shareable link – videos can be seen and shared by anyone with the link.
Step 6: Fill in the details (Vimeo)
-
Fill in the title and description for the video.
-
Set the level of privacy:
-
Anyone – any person can watch the video.
-
Only people I follow – only people you're subscribed to can watch the video.
-
Only me – nobody, but you can access the video.3. Select the resolution of the video and add tags.
Step 7: Save and upload the video
-
Before uploading, the video will be saved as a file on your computer. To change where the video file is stored, click Browse and select a folder.
-
Click Start to begin saving and uploading the video.
See also:
