
|
|
Creating slideshows
With Movavi Video Editor, you can easily create a slideshow in just a few simple steps:
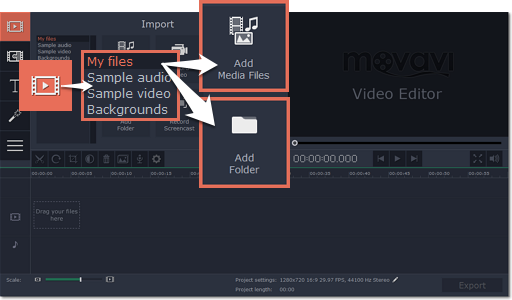
Step 1: Add videos and photos
On the Import tab under the My files section, click Add Folder in the My files section to add the contents of an entire folder (for example, all your vacation photos!) or click Add Media Files to add individual files.
Step 2: Add transitions and set slide duration
Now that you've added the media files, they will appear on the Timeline. Now it's time to set the length of each slide and join them with interesting transitions.
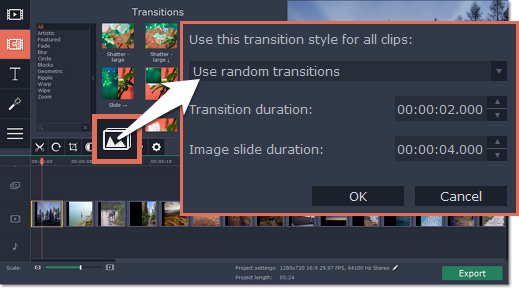
1. Click the slideshow button on the toolbar.
2. In the Create Slideshow dialog box, select a transition style that you want to use for the slideshow. If you want to use different transitions, choose the Random Transitions option.
3. In the Image slide duration field, enter how long you want each slide to be shown on screen. The format is hours:minutes:seconds:milliseconds for both transitions and slides.
4. In the Transition duration field, enter the length for all transitions. Transition length cannot exceed slide length.
5. Click OK to accept the changes and add the transitions.
If you want to change individual transitions, go to the Transitions tab and drag the transition you want in between two clips on the Timeline.
Step 3: Add background music
To add music, go back to the Import tab and click the Add Media Files button to choose a background audio file. If you don't have suitable audio files on your computer, you can use one of our sample music tracks: click Sample audio on the Import tab to open the stock audio collection and drag an audio sample onto the Timeline.
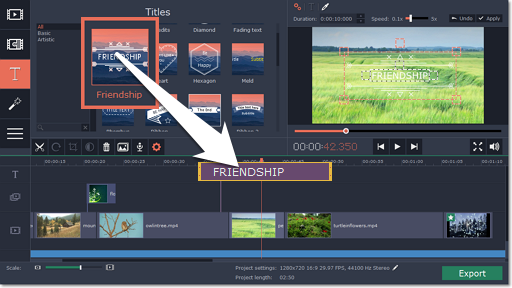
Step 4: Add titles
To add text to your slideshow:
1. Go to the Titles tab.
2. Drag a text style you like onto the top of the Timeline and drop it onto the titles track.
3. Double-click the titles ribbon to edit the clip.
4. In the player, enter your text and set up the font and color options.
5. Click Apply on the options panel to accept the changes.
Step 5: Save your slideshow
Finally, it's time to save your slideshow.
1. Click the Export button in the bottom right-hand corner of the window.
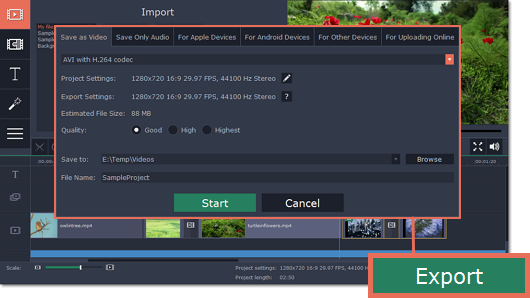
2. In the Save as Video tab of the Export window, choose the format that you want to save the video in. This will affect video quality and file size.
3. The Save to box shows where the video file will be saved to. If you want to choose a different location, click Browse. After that, name your slideshow in the File Name box.
4. Click Start to begin processing your slideshow! This may take up to a few minutes, depending on the size of your slideshow.

