
|
|
Using the Timeline
Jump to: Timeline tracks | Zooming the Timeline | Previewing clips | Arranging clips | Position marker
The Timeline, located in the bottom part of the window, is the working area that allows you to organize and edit the clips. The Timeline consists of several tracks, which are all synchronized to a single time scale at the top, which indicates the time of the project.
The Timeline is made up of several tracks, one for each media type, that allow you to arrange the clips in chronological order; mixing and joining the clips together to create your unique video.
Video track
The video track contains video clips and their attached audio, images, and transitions between clips.
-
You can link audio and titles to video and image clips so that they will stay in sync as you edit the project.
-
You can rotate, adjust, and use other tools on video and image clips on this track.
-
You can apply filters to video and image clips on this track.
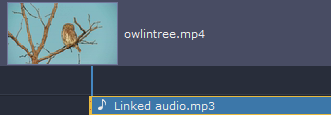
Linked audio track
The linked audio track contains audio clips that are linked to video clips. At the beginning of each linked clip, you can see a blue line that connects it to the video or image clip it is linked to. When you move, split, or delete the clip on the video track, the linked audio clip will also be edited with it. This is useful if you've synchronized the clip's audio to the video track and don't want it to change as you edit your project.
-
The linked audio track is hidden at first, until you drag an audio clip between the independent audio track and the video track.
-
You can edit the audio clips' volume and speed in the Tools tab.
-
You can have several audio clips playing simultaneously. To do that, simply place them one under the other.
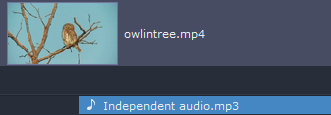
Independent audio track
The separate audio track contains audio clips that are not dependent on clips on the video track. This track is good for background music.
-
You can edit the audio clips' volume and speed in the Tools tab.
-
You can have several audio clips playing simultaneously. To do that, simply place them one under the other.
Titles track
The titles track contains text clips that will appear on top of all other clips.
-
You can change the titles' duration on the Tools tab, or by dragging the edge of the title's clip on the Timeline.
Overlay track
The overlay track contains additional video and image clips to create special effects like Picture in Picture or Chroma Key.
-
Clips on the overlay track are linked to clips on the video track and will stay in sync as you edit the clips.
-
You can apply filters and use all of the Tools to edit the clips on this track, just like any other video or photo.
-
You cannot join clips on the overlay track with transitions.
To select all clips on a single track, click the area with the track's icon to the very left of all clips.
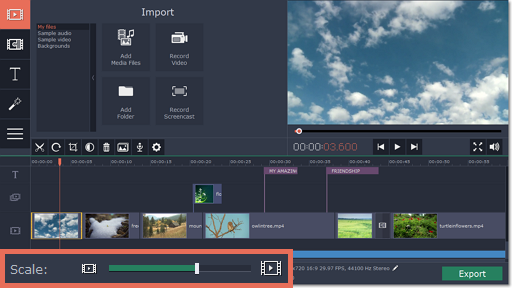
To change the zoom level of the Timeline, drag the Scale slider at the bottom of the window. Move the slider left to zoom out, and move the slider right to zoom in on the Timeline.
To preview a clip, click on it on the Timeline. The position marker will move to where you've just clicked, and the current part of the clip will be shown in the player. Click Play in the player to watch the video.
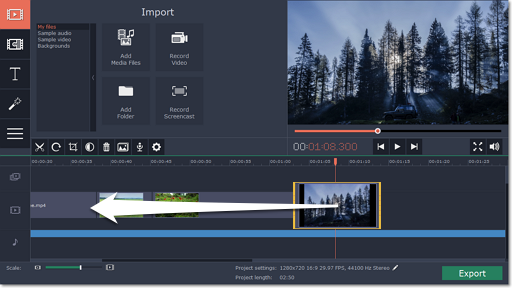
By default, media files will appear on the Timeline in the same order in which you've added them. To rearrange the clips, drag them with your mouse and drop them onto the desired position. To select multiple clips, use Ctrl+click and Shift+click.
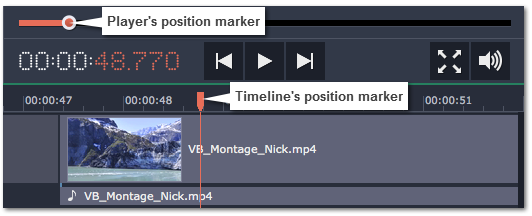
The position marker defines the currently selected point on the Timeline. There are two position markers: the orange line on the Timeline, stretching down from the time scale all the way through all of the tracks, and the position marker on the progress bar of the player. Both denote the current position relative to the whole project and show identical time.
The timestamp in the player displays the currently selected time from the beginning of the project.
There are several ways to move the position marker:
-
Click anywhere on the Timeline to move the position marker to that position.
-
Drag the position marker (either on the Timeline, or in the player). For higher precision, try zooming in on the Timeline.
-
Press the left or right arrow key to move to the beginning of the previous and next clip, respectively.
-
To move in 0.5 second increments, open the Playback menu and choose Skip Forward by 0.5 Seconds or Skip Backward by 0.5 Seconds.
-
To move precisely from frame to frame, use the 'Back' and 'Forward' buttons in the player. This will move the position marker exactly one frame backward or forward.
See also:
