
|
|
Burn an audio CD
Step 1: Open the Burn Disc application in Audio mode
Click Burn audio to CD on the Audio tab of the Movavi Video Suite launcher app.
Step 2: Choose audio disc type
In the Mode section of the right-hand column, choose Audio CD or MP3 CD mode. Standard audio CDs usually fit about an album's length of music, but can retain quality very well, while MP3 CDs allow you to record several folders of audio files to one CD. Please note that not all CD players support MP3.
Step 3: Add the files you want to burn
-
Drag-and-drop files onto the ChilIBurner window, or
-
In the bottom left-hand corner, click the plus icon
 to add a file, or the folder icon
  to add the contents of one or more folders to the list.
Step 4: Set up your disc preferences
On the right panel of the ChilIBurner interface, set the following preferences:
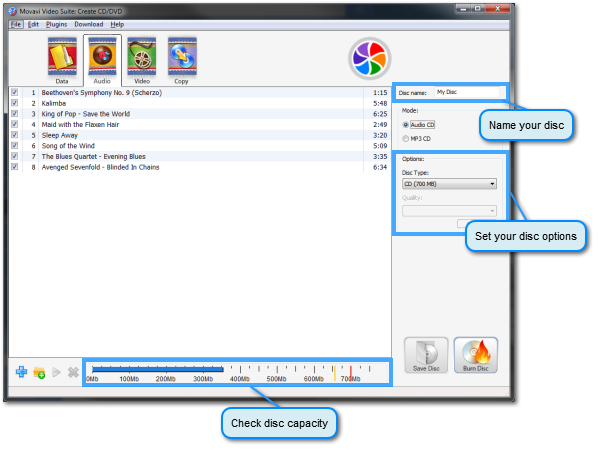
Disc name – located at the very top of the panel. You will see this as the name of the disc drive when you insert the disc into your computer or Blu-ray player.
Disc type – select CD if you have a regular CD Disc, or Mini-CD if you have a CD of smaller size (8 cm or 3.1 inches in diameter versus the standard 12 cm or 4.7 inch CDs).
Quality – if you select MP3 CD mode, you can set the quality of the audio files. Higher quality files have higher bitrate, but take up more space. If you select Audio CD mode, the best quality will automatically be selected.
Step 5: Burn disc
At the bottom of the ChilIBurner window, there is a disc capacity scale. The blue line reflects how much of the disc you will fill when you record the videos, while the yellow and red lines display the maximum capacity of the selected disc type.

Make sure that you have not exceeded the disc capacity. To free up some space, you can delete files from the list or slightly reduce quality for MP3 files.
Then, check that you have a writable CD in your disc drive and click the Burn Disc button to begin the burning process. Your disc will be ready in a few minutes.

